WEEK 11 (FYP 2)
Webcam Interfacing With iSPY....How It Work?
Configuring Web Access
iSpy has it's own webserver built in which allows it to stream your captured content over your local network and out anywhere over the web. The iSpyConnect website is the interface for accessing your iSpy webserver so you'll need to create an account to login. You will need to login through iSpyConnect whether you are accessing iSpy locally over the network or remotely. iSpyConnect restricts access to your iSpy with authentication tokens, preventing people from snooping on your live content and videos. To connect iSpy to web services, click on "Web Settings" on the toolbar menu, enter your login details into the username and Password fields. Next you choose the LAN and WAN ports that iSpy is going to use. The LAN and WAN ports can be any valid port number. If port 8080 is in use by either internal LAN applications or as a visible external port then you can change these here. Next select the IP address to forward to. In some computers there are multiple IP addresses (for VPN accounts/ multiple network cards, wireless cards etc) - make sure you select your LAN IP address. This will typically look like 192.168.1.x. If in doubt, open up a command prompt (start->run->type "cmd") and type "ipconfig". Your local IP address will usually be under an entry that starts with "Ethernet adapter Local Area Connection". Next, click Finish. 9 times out of 10 this is all you will have to do as iSpy can usually sort out the port forwarding automatically. See the following sections if you have any problems.
Connecting Locally
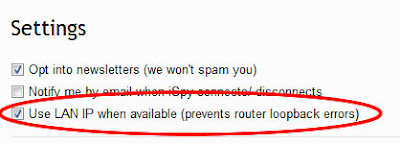
When connecting locally, iSpyConnect detects that you are connecting from the same IP address (gateway) as iSpy so the web page you view accesses iSpy directly over your LAN - without going out to the web at all. This means that iSpyConnect is astonishingly fast at serving video and audio through the browser. You can access iSpyConnect from any computer on your local network in this way (as long as they all use the same gateway). If this is not working (you are getting timeouts) then ensure that the checkbox "Use LAN IP when available" is checked on your account page. If you are still having problems then check your firewall settings (iSpy will try to add itself to your firewall exclusion list automatically) - and failing that try disabling antivirus products or third party firewalls (like zonealarm).
Sometimes your browser can block ports if you specify a non-standard port. If local access isn't working try setting the LAN port to 80 or 8080. Ensure that these ports are not already in use.
Setting up Port Forwarding
If automatic port forwarding fails for any reason you will need to do it manually:
- Make a note of the IP address that is highlighted in the web services panel (Configuring Web Access)
- Login to your router and forward incoming traffic to this port to this IP address. The default address of your router varies from manufacturer to manufacturer. If you don't know the address of your router try the following:
- Linksys routers: 192.168.1.1
- D-Link and Netgear routers: 192.168.0.1
- US Robotics routers: 192.168.123.254
- SMC routers: 192.168.2.1
*You can find other default addresses using google.
- You will be prompted for a username or password. Typically this is admin/ password or admin/ admin unless it has been changed.
- Once you are logged in you will see a configuration screen. Again these vary depending on the make of your router. You need to find the page that deals with port forwarding. Look for a menu marked NAT or Port Forwarding or Virtual Servers.
- Add the port forward address in - you need to copy the WAN port (default is 8080) into the external port setting, the LAN port (default is 8080) into the local port setting and the IP address you noted in step 1.
- Click Save Settings (or similar) and then go back to iSpy Web Settings and click OK and we will try to connect to your computer again.
If you still can't get it to work see Troubleshooting.
Using DynDNS.org
You can also use Dynamic DNS (free) to connect to iSpy - just enter your dyndns address (eg ispyrocks.dyndns-at-home.com) and iSpyConnect will use this instead of your static IP Address. Note that iSpy does keep track of your external IP address so if it changes you will still be able to access iSpy remotely. You can add your dyndns address in your Account Page.


Comments
Post a Comment